

In Winter 20, salesforce introduced the ability to schedule a flow, which allows you to run a specific flow on a daily basis, for example. With Spring ’21, salesforce goes one step further by introducing scheduled paths inside of a flow.
With Scheduled flow, you can trigger certain types of events based on the date fields on the object that triggered the flow. A good example of a Scheduled flow would be to create a task AND schedule a notification to send to a user one hour before the task is due. In the past, this required much heavier lifting.
Table of Contents
Point to Remember
Before you start with Scheduled flow, you should note that they are currently only available on the following Record-Triggered types:

You should also note that the (Schedule Flow) feature is only displayed if you are using the Freeform layout in Flow. They are not available in the Auto-Layout generator which is currently in beta. When you have satisfied the above conditions and then have chosen the object, the Scheduled Flow option automatically appears in the initial step of the flow.
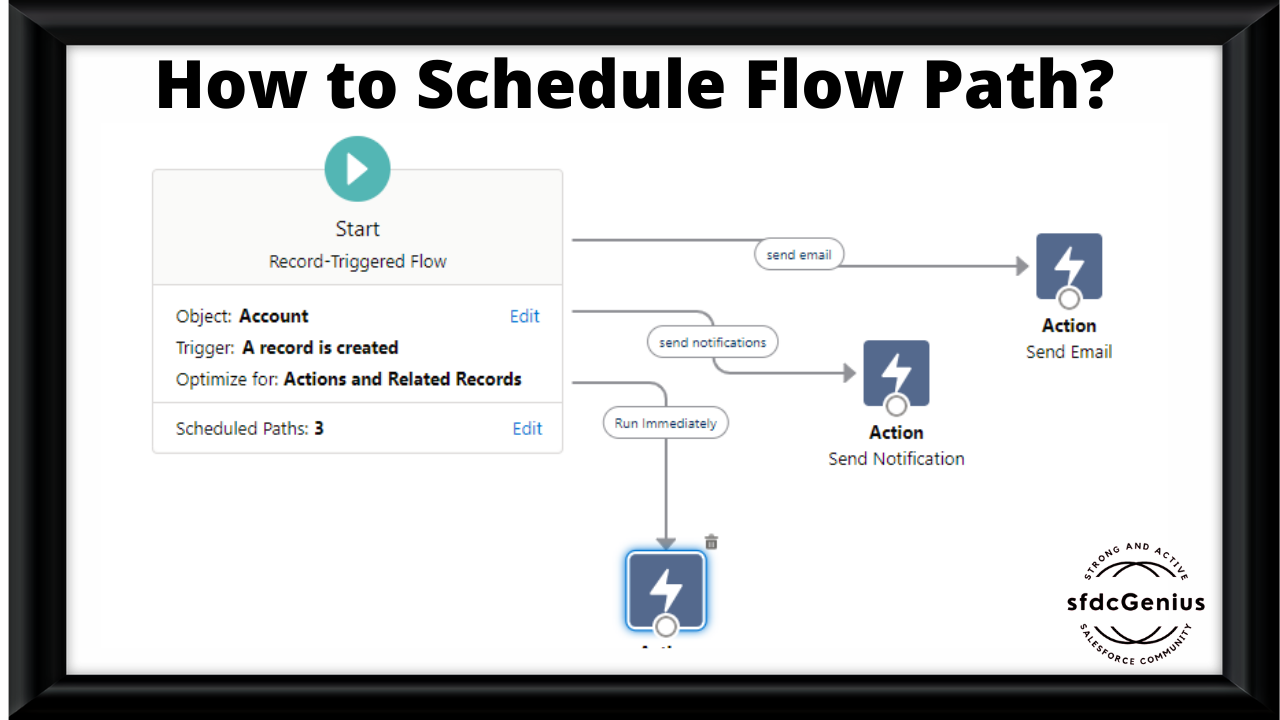
Step by step how to Schedule Flow Path:
Steps to create Flow :
- Go to Setup.
- Search flows in quick action.
- Click on New flow button.
- Click Record-Triggered Flow.
- Select Freeform in “How do you want to start building?“.
- Select Object, Configure Trigger (Trigger the Flow When: e.g. created , updated, created/updated or deleted ). These are required field.
- Set entry conditions. This is optional.
- Optimize the Flow for eg. for create or update choose between before or after save and delete for delete.
(Note: If a deleted records are later restored, the flow’s database changes and actions aren’t rolled back. Also, record recovery can’t trigger a flow to run. If you required automation when records are recovered from the Recycle Bin, consider using an Apex after undelete trigger.) - Done.
Step To Create Scheduled Path in Flow :
- Once you done with above steps Scheduled Flow option appears as (+Add Scheduled Paths(Optional)).
- Click on +Add Scheduled Paths(Optional).
- There are 2 options.
- Run Immediately
- New Scheduled Path
- Run Immediately is default to run flow immediately when condition meet.
- Click on (+) icon to add New Scheduled Path.
- Give required fields i.e. Path label, API Name, Time Source, Offset Number and Offset Options.
(Note:
Time Source is picklist field which have only date, date/Time data type field as value you have to choose one from available option.
Offset Number is number field where you have enter number eg. 5 (means 5 days/Hours after/before of selected Time Source.
Offset Options is picklist field which contains 6 options ( Days After, Days Before, Hours After, Hours Before, Minutes After, Minutes After) - In Advanced Options you have to give Batch Size. This is optional.
(Note : Enter the number of records that this path can process at the same time. The default is 200, which is the maximum, and the minimum is 1. For example, if you specify a batch size of 2, and seven records are scheduled to be processed in the same time interval. Flow Builder groups them into four batches. Set a batch size smaller than 200 to improve performance and to avoid hitting Apex governor limits). - Create multiple paths and branch each path from the start of the flow.
- So that you can run multiple actions from the single flow based on the defined schedule.
For each path, you must specify the date/time field used to calculate the start time, and then specify how many hours or days after that path should be run.
How to Debug Schedule Flow ?
Once the Flow is active create some records to check scheduled flow.
To check to follow the below steps:
- Go to setup.
- Search Environments in Quick action.
- Click on Monitoring.
- Select Time-Based workflow.
Here you can see the scheduled path for the records.
(Note: If the Time source value changes Scheduled flow automatically adapts the new value.
Conclusion
Scheduled Paths are a fantastic new addition to Flow that opens up a lot of possibilities without having to write any code. Note that there are requirements to make them available for use.
Fabulous article on Salesforce flow. Spread the knowledge
Thanks Nadeem
Hi! I’m at work browsing your blog from my new iphone
4! Just wanted to say I love reading through your blog and look
forward to all your posts! Carry on the outstanding work!
Howdy! I could have sworn I’ve visited this web site before but after going through a few of the articles I realized it’s new to me.
Anyways, I’m certainly delighted I found it and I’ll be bookmarking it and checking back often!
Hurrah, that’s what I was searching for, what a stuff!
present here at this weblog, thanks admin of this web site.
Wow, great article post. Cool.
You made some clear points there. I looked on the internet for the topic and found most guys will go along with with your blog.
Everything is very open and very clear explanation of issues. was truly information. Your website is very useful. Thanks for sharing.